
Why No One Clicks Your Website Links
Before people see your landing page, they see its social link preview. Here is how Open Graph images and og:image tags make shared website links look trustworthy.
By Suryansh Kushwaha /
On this page
Your hero section is not the first thing people see when your website is shared.
That sounds wrong, I know. We spend hours polishing the headline, the spacing, the CTA, the exact first viewport. And yes, your landing page hero matters.
But only after someone clicks.
Before that, your website usually appears as a small preview card inside LinkedIn, WhatsApp, X, Discord, Slack, iMessage, or wherever someone pasted the link.
That card is the real first impression: the title, the description, and the image social platforms pull from your metadata.
If that card looks broken, vague, random, or unfinished, people make a judgment before your website even gets a chance.
That can cost clicks. For a business website, it can cost leads. And if you are running ads, sharing proposals, posting launches, or sending links to potential customers, it can quietly cost real money.
All because of one thing most people forget:
OG images.
The Page Before the Page
Search for this problem and you will see the same phrases everywhere:
- "link preview not showing image"
- "LinkedIn preview image not updating"
- "website preview card wrong image"
- "Open Graph image not showing"
- "og:image not working"
- "Twitter Card preview not showing"
Different words. Same problem.
Your website might be good, but the shared version of your website looks bad.
Maybe it shows a random cropped image. Maybe it only shows your favicon. Maybe it pulls some generic title from your homepage. Maybe WhatsApp shows nothing. Maybe LinkedIn keeps showing an old image from three deploys ago because the preview cache is having its own personality crisis.
That thing is not a hero section problem.
It is an Open Graph problem.
And honestly, it is crazy how many people with their own website just do not implement this. Not because they are lazy. Most people are simply unaware that this exists, or they assume the browser/social app will magically figure it out.
It will not.
What Is an OG Image?
OG stands for Open Graph. It is basically metadata that tells social platforms and messaging apps how your page should look when someone shares it.
The important pieces are:
- the title
- the description
- the preview image, usually
og:image - the URL
The preview image is the part people actually notice first.
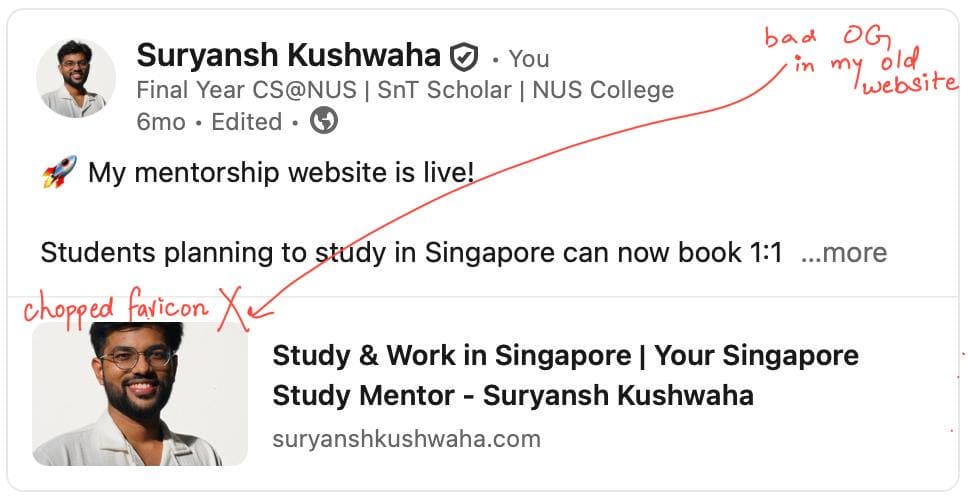
If your OG image is missing, platforms start guessing. And their guesses are not designed to make your website look good. They are designed to fill a card with whatever metadata they can scrape.
That is why a good website can look weird when shared.
And if your website depends on trust, that weirdness is expensive.
Why I Care So Much About This
For my static routes, I have custom, well-defined OG images.
Homepage. Hire Me. Studio. Mentorship. Work. Contact. Blog. Even the policy pages. They all have their own share cards.
So if I just post my link somewhere without writing a single extra line, the preview already tells people what the page is about. That is the point.

This matters even more if you are doing client work, freelance work, mentorship, or selling anything from your site. The shared link is often the first thing a person sees. Before your hero section. Before your copy. Before your carefully crafted buttons.
The share card is the first impression.
And yes, that sounds dramatic. But go share a link with no OG image and tell me it does not look like someone shipped at 3am and forgot to come back.
If you want this handled properly instead of becoming another "I'll fix it later" thing, I build full websites with the SEO, metadata, Open Graph images, and launch details wired in from day one. You can check the details on my Studio page.
The Static Route Way
The simplest version is this: make one image per important route and wire it into metadata.
My project has a folder that looks like this:
public/og/
├── blog.jpg
├── contact.jpg
├── hire-me.jpg
├── home.jpg
├── mentorship.jpg
├── studio.jpg
└── work.jpg
Then each page can point to the right image through metadata.
In my codebase, I have a shared SEO helper so every page does not manually write the same Open Graph and Twitter metadata again and again.
export function buildSeoMetadata({
  description,
  image = siteConfig.defaultImage,
  imageAlt = siteConfig.defaultImageAlt,
  path,
  title,
  type = 'website',
}: SeoMetadataOptions): Metadata {
  const titleText = typeof title === 'string' ? title : title.absolute;
  const canonical = absoluteUrl(path);

  return {
    title,
    description,
    alternates: {
      canonical: path,
    },
    openGraph: {
      description,
      images: [
        {
          alt: imageAlt,
          url: image,
        },
      ],
      title: titleText,
      type,
      url: canonical,
    },
    twitter: {
      card: 'summary_large_image',
      description,
      images: [image],
      title: titleText,
    },
  };
}
Then a normal route becomes boring, which is exactly what you want.
export const metadata: Metadata = buildSeoMetadata({
  description:
    'Selected projects, client work, and software systems built by Suryansh Kushwaha.',
  image: '/og/work.jpg',
  imageAlt: 'Suryansh Kushwaha work social preview.',
  path: '/work',
  title: {
    absolute: 'Work by Suryansh Kushwaha',
  },
});
That is it. The page has its own preview.
No weird random screenshot. No generic fallback.
This is also why I do not treat OG images like decoration. They are part of the conversion path. Someone sees the preview, decides if it looks trustworthy, and then clicks or ignores it.
But Doing This for Every Blog Post Sounds Painful
This is where people usually give up.
"Okay fine, static pages can have custom OG images. But am I supposed to open Figma every time I publish a blog post?"
No.
Please do not do that to yourself.
This is where dynamic OG images are beautiful. You create a template once, feed it the post title, description, date, topic, maybe your domain, and let the framework generate the image for every post.
That is what I have implemented for this blog. As a matter of fact, the post you are reading right now has a generated OG image. Try sharing this link on any social media app. You should see a proper, definitive preview without needing me to write a separate caption explaining what the post is about.
That is exactly my intent.
The Blog Setup
My blog posts live as MDX files:
content/blog/
├── 001-building-production-site-for-free-with-ai.mdx
├── 002-my-ai-workflow-that-actually-works.mdx
├── 003-why-no-one-clicks-your-website-links.mdx
└── posts.ts
Each post has frontmatter:
---
title: Why No One Opens Your Shared Website Links
description:
  Before people see your landing page, they see its social link preview. Here is
  how Open Graph images and og:image tags make shared website links look
  trustworthy.
topic: coding
tags:
  - SEO
  - Open Graph
  - Next.js
publishedAt: 2026-05-30
---
That frontmatter already has the ingredients for a good OG image:
- title
- description
- topic
- date
- reading time (generated automatically)
So instead of designing a new image manually, I can generate one.
The Route Structure
In Next.js App Router, you can create image routes inside app.
My generated blog OG route sits here:
app/
└── blog/
    └── [slug]/
        ├── page.tsx
        └── og-image/
            └── route.tsx
I am using a route handler path (/blog/[slug]/og-image) and then pointing each
blog post's metadata to it.
export function getGeneratedBlogOgImagePath(
  slug: string,
): `/blog/${string}/og-image` {
  return `/blog/${slug}/og-image`;
}
If a post does not define a custom ogImage, the blog registry falls back to
that generated route.
const explicitOgImage = getOptionalString(data, 'ogImage');
const ogImage = normalizeAssetPath(
  explicitOgImage ?? getGeneratedBlogOgImagePath(slug),
  'ogImage',
  fileName,
  true,
);
So every blog post automatically gets a unique share image.
The Metadata Wiring
The blog page metadata uses the generated OG image path directly:
export async function generateMetadata({
  params,
}: BlogPostPageProps): Promise<Metadata> {
  const { slug } = await params;
  const post = getBlogPostBySlug(slug);

  if (!post) {
    return {
      title: 'Post not found',
      robots: {
        index: false,
        follow: false,
      },
    };
  }

  return {
    title: post.title,
    description: post.description,
    openGraph: {
      description: post.description,
      images: [
        {
          alt: post.ogImageAlt,
          url: post.ogImage,
        },
      ],
      title: post.title,
      type: 'article',
      url: absoluteUrl(post.href),
    },
    twitter: {
      card: 'summary_large_image',
      description: post.description,
      images: [post.ogImage],
      title: post.title,
    },
  };
}
Two details matter here:
openGraph.imagesis what most platforms look for.twitter.card: 'summary_large_image'tells Twitter/X to use the big card layout.
Do not skip the Twitter metadata. Some platforms read Open Graph, some read Twitter card metadata, and some do their own questionable mixture of both. Give them the data cleanly.
Also, use a proper absolute URL in production. Social crawlers are not your browser. They do not patiently run your app, click around, and infer intent. They read metadata.
The Actual Image Generation
The image route uses ImageResponse from next/og.
The core idea is simple: fetch the blog post by slug, then return JSX that renders into a PNG-like image response.
import { ImageResponse } from 'next/og';

import { siteConfig } from '@/config/site';
import {
  formatBlogDate,
  getAllBlogPosts,
  getBlogPostBySlug,
} from '@/content/blog/posts';

export const dynamic = 'force-static';
export const dynamicParams = false;
export const runtime = 'nodejs';

const ogImageSize = {
  height: 630,
  width: 1200,
};

export function generateStaticParams() {
  return getAllBlogPosts().map((post) => ({
    slug: post.slug,
  }));
}
I force it static because these are blog posts. They are known at build time. There is no reason to regenerate the same image on every request.
Then the route itself:
export async function GET(
  _request: Request,
  { params }: BlogOgImageRouteProps,
) {
  const { slug } = await params;
  const post = getBlogPostBySlug(slug);

  if (!post) {
    return new Response('Blog post not found.', {
      status: 404,
    });
  }

  const titleSize =
    post.title.length > 84 ? 56 : post.title.length > 56 ? 64 : 72;

  return new ImageResponse(
    <div
      style={{
        backgroundColor: 'hsl(0 0% 0%)',
        color: 'hsl(0 0% 98%)',
        display: 'flex',
        flexDirection: 'column',
        height: '100%',
        justifyContent: 'space-between',
        padding: 64,
        width: '100%',
      }}
    >
      <div>
        <div
          style={{
            color: 'hsl(36.1 100% 68.4%)',
            display: 'flex',
            fontSize: 20,
            fontWeight: 700,
            marginBottom: 48,
          }}
        >
          {post.topicLabel}
        </div>

        <div
          style={{
            display: 'flex',
            fontSize: titleSize,
            fontWeight: 700,
            lineHeight: 1.05,
            maxWidth: 940,
          }}
        >
          {post.title}
        </div>
      </div>

      <div
        style={{
          color: 'hsl(240 5% 64.9%)',
          display: 'flex',
          fontSize: 24,
          justifyContent: 'space-between',
        }}
      >
        <div>
          {formatBlogDate(post.publishedAt)} / {post.readingTime}
        </div>
        <div>{siteConfig.url.replace(/^https?:\/\//, '')}</div>
      </div>
    </div>,
    ogImageSize,
  );
}
That is a simplified version, but it shows the point. This is just React-ish JSX, except the output is an image as shown below.

One Nice Detail: Use Your Real Design Tokens
One thing I did not want was for the OG images to become a second disconnected design system.
So my route reads tokens from app/globals.css and uses the same brand colors
as the site.
function readThemeTokens(): ThemeTokens {
  const globalsCss = readFileSync(
    join(process.cwd(), 'app', 'globals.css'),
    'utf8',
  );
  const tokens: ThemeTokens = new Map();

  for (const match of globalsCss.matchAll(/--([a-z-]+):\s*([^;]+);/g)) {
    const [, name, value] = match;

    if (name && value) {
      tokens.set(name, value.trim());
    }
  }

  return tokens;
}
Is this required? No.
But I like it because the OG image now belongs to the same system as the rest of the site. If my brand color changes later, the generated card follows.
Small thing. Big polish.
The Checklist I Would Actually Use
If you have a website, here is the practical version:
- Create one default OG image for your whole site.
- Create custom OG images for important static routes.
- Add
openGraph.imagesandtwitter.imagesin metadata. - For content-heavy dynamic routes like blogs, generate OG images from content.
- Test by sharing the link in real apps, not just by staring at your code.
This is not just SEO busywork. This is presentation. Distribution. Trust.
People share links in messy places. Group chats. DMs. Discord servers. LinkedIn comments. Client conversations. If your link preview is clear, it does a little bit of selling before the click.
The Part People Miss
Most devs treat the website as the thing that starts after the click.
But for a shared link, the experience starts before the click.
That preview card is part of your website.
So yes, build the nice homepage. Write the clean copy. Make the page fast. But also make sure that when the link leaves your site and travels through the internet, it still looks intentional.
Because if your link preview looks broken, people do not know that your actual website is good.
They just see the preview.
And the preview is your first handshake.
If you are building a website for a serious business and do not want these details to be afterthoughts, I handle this kind of thing inside my Studio work: the website, the metadata, the launch polish, and the small pieces that make the whole thing feel trustworthy before and after the click.